Showing posts with label free tutorial. Show all posts

Thursday, November 15, 2012

DIY gifts for guys

for the boys
L - R: Knit gold club covers, leather journal, lanyard key ring,
monogramed ties, laptop sleeve, mustache mug,
comic coaster, beer soap, toiletries bag.

I find that making gifts for guys is much trickier than crafting for the ladies and little ones in my life.  And I know from the comments on the last post that I am not alone in this. I have been browsing the web for inspiration though, and I found several great crafty ideas for different skill levels. I am especially loving those knitted golf club cozies.

Do you have any go-to man crafts? Any other suggestions for making handmade and meaningful Christmas gifts for our dearly loved gents?

Monday, December 5, 2011

Embroidered napkin tutorial

I've been working on these embroidered linen napkins as a Christmas gift for a lovely someone who will appreciate a handmade Nana style gift from yours truly. They are simple but sweet and I've put together a little how to for anyone interested.

+

You will need:

Napkins - you can make them yourself or pick them up from a craft shop. I found mine on sale at Spotlight.
Embroidery needle
Six Stranded Embroidery thread - you could use white as I have, one colour or multiple colours
Embroidery hoop - slightly larger than your design, but not too large, so it isn't cumbersome
Washable Erasable marking pen - from a craft shop

+

You will also need designs for you napkins of course. I drew these myself, using a tin to trace around for the circles and decorating each one differently, six in total. You can draw your own or search for free Christmas embroidery patterns online. (If anyone is interested I can scan my pictures and add them to this tutorial.)

+

Print or draw your designs in a dark colour, lay your napkin in your desired position over the design and trace with the washable marker. If you have a light box you can use this. Or you can tape both pieces in place on a window with light coming from behind and trace it there. Mine was easy enough to see as is.

+

Place work in hoop, gently tugging on the fabric all the way around to pull it tight. Tighten the thread on the screw at top so everything is secure. Cut a manageable length of embroidery thread. I tend to use about a 40 - 50cm length. Divide the thread in half, so you are left with three strands in each half. Thread your needle with the three threads, make a knot at the end and start stitching.

+

I used back stitch and French knots on my napkins, but you can be as inventive as you like and use as many stitches as you like. Stitch happily each night for a bit of couch craft or sneak in some stitching while children nap or friends visit. 

+

Pull your napkin out of the hoop, wash and iron it and admire your handiwork. Consider keeping it for yourself. Wrap it up beautifully with your other completed napkins and gift lovingly to someone special.

Monday, November 28, 2011

Christmas Decoration Tutorials

Christmas decoration inspiration

Happy Monday folks! With only one more birthday left before Christmas, my attentions have turned towards decorations. (And felt. I love felt. Don't you?) I can't wait to put our tree up this year with the little mans help. He did so love to rearrange the decorations last year after all. But we shall be waiting until the 1st of December, as is tradition.

It wasn't until we had Cohen that we started our family Christmas traditions. Before that we had no tree and no decorations, which seems a little sad now. Children do tend to change all that. Since then I have been adding to our box of decorations each year, both before and after Christmas. And while last year I focused on hand making gifts. This year I think a few simple handmade decorations are in order instead.

I have found some wonderful tutorials online and feel that a trip to the craft store is in order. Do you have any plans for home made decorations this year? Or have you already been working on Christmas crafts? Please leave a link in your comments if you have so we can come and visit!

Thursday, August 11, 2011

+


Old French spools

I have been gathering quite a few tutorials of late in my bookmarks and on my facebook page. It never fails to amaze me the time and thought that goes into these free tutorials and the new skills and inspiration they generate. I thought perhaps I would share some of those lovely and useful tutorials here.

Beautiful 'lavender bottles' for your linen drawers over at 'laundry etc'
Homemade laundry liquid recipe at 'Down to Earth'
How to weave in the ends of your knitting at 'Purl Bee'
Funky freezer paper stencil pillow cases at 'Metal & Mud'
How to make wheat bags with 'home life'
A lovely crochet flower square pattern at 'The Lazy Hobbyhopper'
Nature explorer bag for the little ones by 'Chez Bepper Bebe'
And these two cushions are a bit girly and sweet too.

Have you found or used any great free online tutorials lately?

Thursday, May 19, 2011

+

Ribbon flower tutorial...

+

My sister, Fiona, is not only a fabulous bibliophile with an assembly of university degrees, she is also in possession of numerous artistic and crafty talents. She has been crafting these simple and sweet vintage inspired ribbon flowers as part of her wedding decorations. Like anything, there are probably many different ways to make these flowers, but I was fascinated watching her make these today and wanted to share them with you.

You need only rummage through the kitchen draws and dash to the local craft shop, then settle yourself in front of a film or fire place and you are all set. Fiona has used 50cm lengths of ribbon, whose raw edges she carefully singed with a lighter, florists wire snipped in half and adorned with faux pearls (though buttons would work just as well) and a running stitch (either by hand or with a sewing machine) along the edge of the ribbon, which you pull tight to create the gatherings. She then twists the flower into shape and secures it with a few simple hand stitches underneath, before sliding the florist wire and pearl though the center and adding a drop of glue at the base of the pearl at the last moment. Thus creating sweet ribbon flowers that could be used as decorations, brooches or hair clips.

The wedding is not until September, but I promise to share photos from the big day. There will be many crafty and vintage delights to behold.

-

More Creative Spaces here.

Thursday, November 25, 2010

My Creative Space...

+

+

+

There are three pairs of finished toddler oven mitts in my creative space today, to accompany the toddler aprons. Like the aprons, they are small and sweet and I can't help but love small and sweet things. I hope they inspire many hours of imaginative play amongst the recipients.

I made the mitts using the scrap fabric from the aprons, 6.5 stitches free pattern and tutorial, as well as some iron on pellon, which I 'borrowed' from my Mother's sewing room (thanks Mum). The pattern is really good, but never fully able to follow a pattern, I decided to add some simple binding to the cuffs - using three inch wide strips of the scrap fabric folded and ironed to form the binding - as well as adding a little fabric tape loop for hanging.
-
More Creative Spaces here.

Wednesday, November 17, 2010

+

+

+

A birthday present for a friend's big boy who is turning four. Made using Pip's great Where the Wild Things Are Christmas stocking tutorial yesterday while Cohen slept. 

There will be a little gift inside too. I hope he likes it!

Friday, October 22, 2010

Crochet flower tutorial...

Thanks for the lovely comments about the crochet flowers I've been making. Their purpose is a bit of a secret, but I thought I would share the pattern here with you so that you can use them as you wish. Perhaps for pretty hair clips, a flowery garland or stitched to a blanket?

Fiona's flowers

I'm using bella baby layette bamboo and wool mix, which is an 8ply, and a 3.5mm steel crochet hook.

Start by making 4 chain stitches. Slip stitch to form a loop.
+
Chain 3 stitches, which will be counted as 1 double crochet. Then crochet 15 double crochet into the loop. (16 in total)
+
Slip stitch to join circle of double crochet stitches and bind off. Change colour and chain 3.
+
Skipping next stitch, slip stitch into the top of the 2nd double crochet stitch, chain 3, skip next stitch and slip stitch into second stitch, continue until end. Slip stitch into first slip stitch to complete.

(So you are chaining three and anchoring your chains at every second stitch to make the gap that you will be working the petals into.)
+
To make flower petals work into the gap and not the chain stitches. 
Work 1 single crochet, 3 double crochet, 1 single crochet, into each gap the whole way around. Slip stitch from final petal into first petal to join them up.

(So 1 single, 3 double, 1 single = one petal. No need to chain stitch to get to the next petal. Just start your next single crochet stitch into the next gap.)
+
Your finished flower!
+
Turn flower over and from the back weave in the ends. I like to pick up stitches moving away from the work, then pick up the alternating stitches back towards the work. 
+
Cut off ends close to your piece and your done!
+

I hope that makes sense! Please feel free to ask any questions.

Friday, June 25, 2010

Wool Keeper...

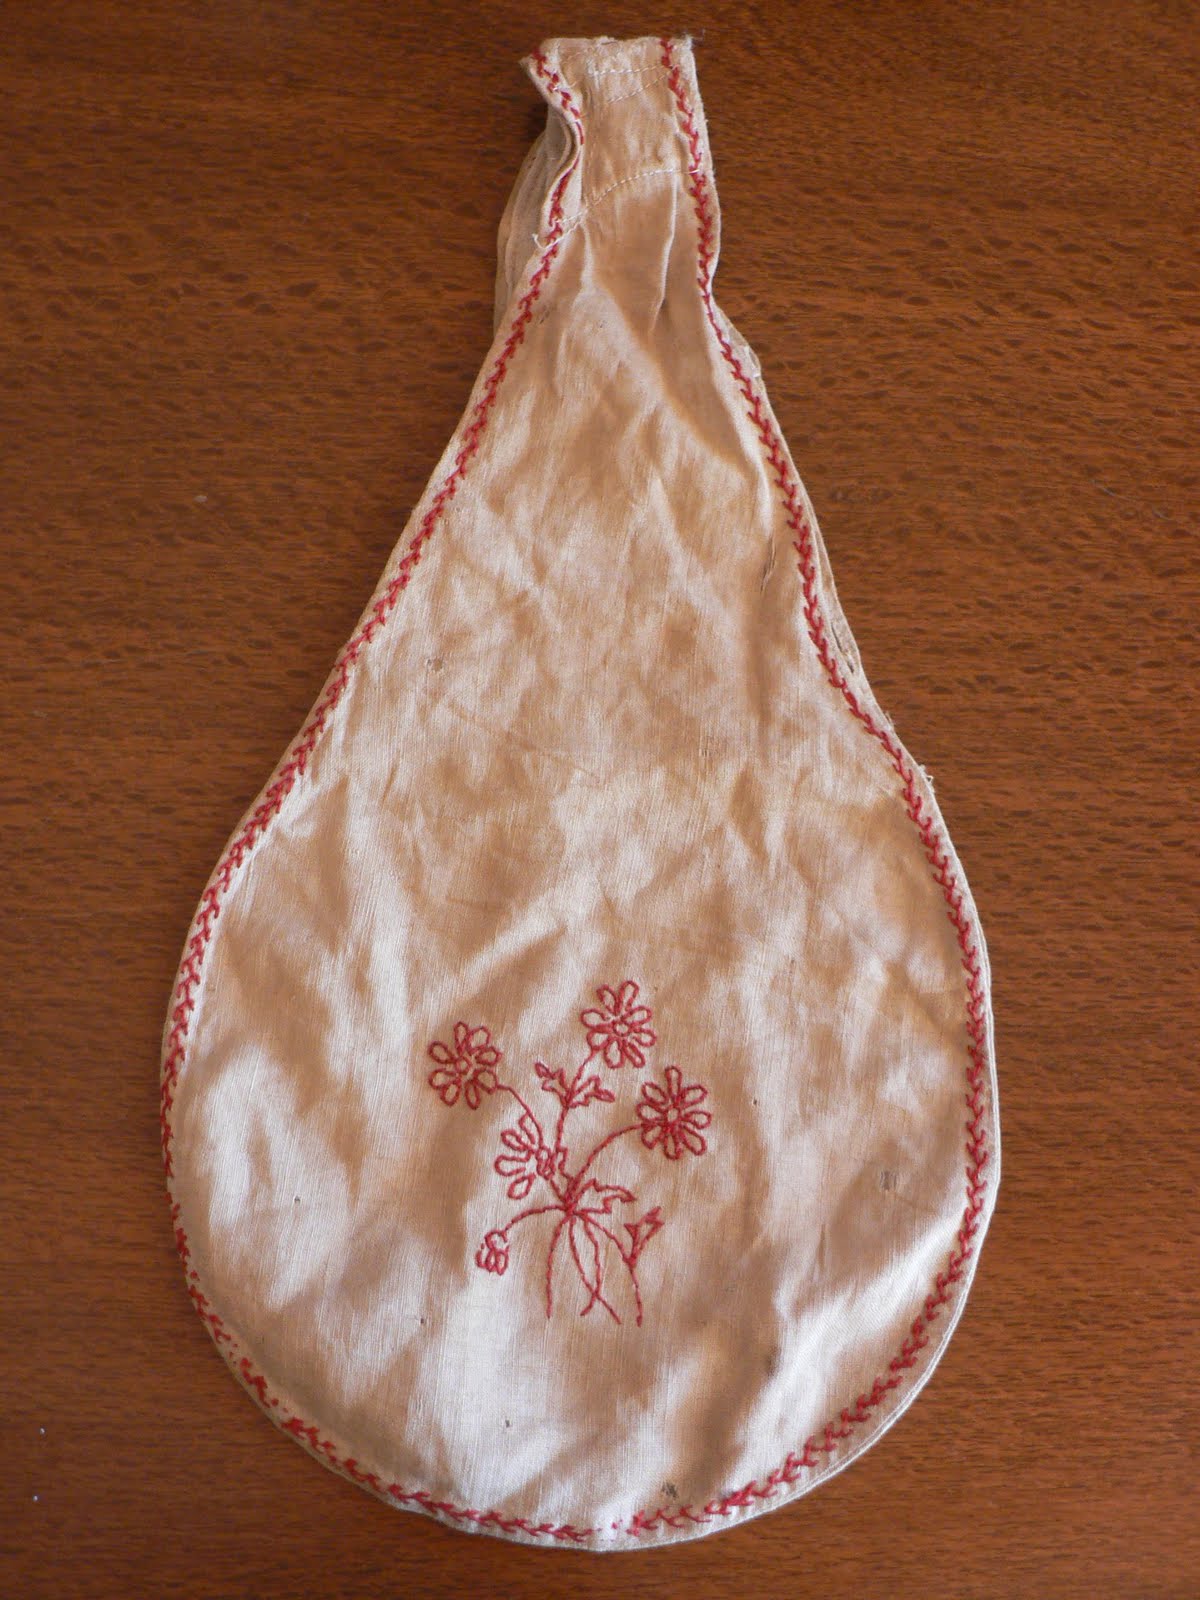
This dear little piece of handwork is over a hundred years old, the work of my Great Grandmother.
It is a simple and smartly designed bag, which slips over the wrist and holds a ball of wool.
The perfect solution for keeping yarn out of harms way and making projects more portable.
It has seen many years of use. The calico fabric has been mended time and time again.
A reminder that it was indeed a precious item.
And still is.
As I couldn't bear to use it, I decided to make one for myself.
I've included a little tutorial in case anyone else would like to make one for themselves.
It is a quick and easy project.
My apologies for the dark photos, but I tended to be taking them when Cohen was napping.
Materials
0.25 meter of calico (10 inches) - which costs about $1.25 at my local craft store and is enough fabric to make two bags
DMC Embroidery Thread - Colour 321 was the closest to the original thread
Embroidery hoop
Embroidery needle
Scissors
Sewing machine - alternatively you could hand stitch
Natural coloured cotton thread
Pins
Gather materials. Find a bowl or plate approx. 21cm wide (8 inches) and trace around the bowl and using the images above and below as a guide, draft the shape of the handle. You might like to do this on tracing paper first and then fold the piece in half and adjust it so both sides are equal. Draw outline on two pieces of fabric. Fit fabric in embroidery hoop and embroider image of your choice, or print and trace the image of the original stitching above.
I've used a simple outline stitch.
Initials are a nice alternative.
Stitch two pieces, so you have a back and a front and cut them out following your drafted shape. Fold each piece in half and make a 1 cm snip 21 cm (8 inches) from the top of the piece. Repeat on second piece of bag.
Flatten pieces back out again. Join the bottom half below the snips using a French seam, thus forming the pocket at the bottom of the bag to hold the wool.
Using a French seam, sew the two short edges of the handle together.
Above the snips in the fabric, fold the raw edge under twice and pin, so the finished seam will meet up with the French seam below. Sew down. Repeat on each side. Thus forming the handle at the top of the bag. I reinforced where the two seams meet.
And here is the wool keeper, almost finished.
A quick pressing and some feather stitching around the handle and my new wool keeper is ready to hold my next project. I will post another photo when I am finished, but I was much to keen to share the project than to be able to wait until all the stitching was finished.
What do you think?
Feel free to ask any questions.
-
Please post a link if you make one of these wool keepers, I would love to see it.

Tuesday, March 30, 2010

Crochet hook roll tutorial...

Supplies:
3 fat quarters of fabric of your choice
Pins
Scissors
Dressmakers chalk or invisible pen
Sewing machine
Cotton, colours of your choice
Iron
-
Optional:
Rotary Cutter
Quilting Ruler
Quilting Mat
Start by ironing your material and choosing which will be the back, inside and pocket fabric.
I chose the bird print for the back, the brown print for the inside and the cream print for the pocket.
Cut back and inside pieces to 19 inches wide and 13 inches high - I used my quilting mat, ruler and cutter for this.
Cut Pocket to size 6 x 19 inches.
Cut ties to size 1.5 x 20 inches.
You should have 1 back, 1 inside, 1 pocket and 2 ties cut out.
Fold fabric for the ties in half, right sides facing and iron in place. Pin raw edges together and sew along raw edges on the long side and one short side, leaving one short side open for turning. Repeat on other tie.
Using a chopstick or similar turn ties out the right way, iron flat and sew closely along the seam on the right side to finish.
Fold top of fabric for pocket over 1/4 inch and iron, fold another 1/4 inch, iron and stitch close to edge to make hem.
Pin pocket wrong side down to right side of inside fabric, corners meeting at bottom.
Pin both ties to the right side front fabric 4 inches from the bottom.
Sandwich all pieces and pin together so that the back fabric, the ties and the pocket all lay right side down onto the inside's right side fabric.
Using pins, mark an opening on the opposite side of the fabric from the ties about 2 inches wide. Sew around the entire piece, leaving this two inches open.
Clip corners and turn piece right side out through the 2 inch gap left.
Use chopstick to push out corners.
Once right side out, iron piece so that the seam allowance of the two inch gap is tucked inside the piece.
Stitching close to the edge of the work, sew around the entire roll, thus closing the gap and finishing off the rolls edge.
Using dressmakers chalk or an invisible pen that will wash out in water, mark out the stitching that will hold the hooks in the pocket.
I left a 4 inch gap between the ties and the first row of stitching so that there is room for scissors, stitch markers etc. and spaced the rest of the stitching an inch apart.
Sew along the marked lines and trim loose threads.
Fill with crochet hooks and goodies, roll up it up and you are done.
And there you have it. I would love to see photos of any that you make.
Please feel free to ask questions or let me know if you have spotted any mistakes.
-
Sandy has made two crochet hook rolls using the tutorial.
Have you made one too?
Related Posts Plugin for WordPress, Blogger...